Lecture 9: Python in x, exam
The filter

This fancy thing is making a subset of points and using them as the centre point for some spheres. It’s taking advantage of the cull pattern node in Grasshopper. This actually works a lot like boolean indexing in Pandas; it takes a list of booleans and masks the other list with it. E.g. given
pattern = [True,  True,  False,  True]
list    = [point, point, point, point]
it’d give you [point, point, null, point], and Grasshopper only puts spheres on points, not nulls.
This is cool’n’all, but it’s a lot of nodes to achieve a simple thing. In real life we’d probably just make a cluster to handle this, but for now, let’s imagine that this is actually a really logic intensive operation that would require loads of nodes, and can be achieved in just a few lines of python. (You’d be surprised how often this kind of thing happens once you start looking.)
Getting Python in Rhino
Get the python plugin from here and install it. That’s it. Now you can use it by putting a python node onto the canvas from the math panel.
Simple Python Filter
![]()
If we plug some stuff into our node nothing will happen, but it’ll give us something to work with.
To get into the editor, double click the python node:
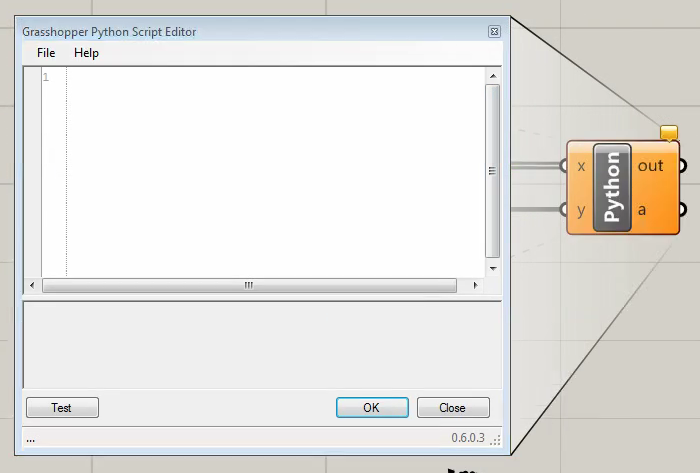
That gives us this slightly sad editor. (After the luxury of atom.) There’s nothing in here to give us a clue what to do, it’s scary!
Fear not, there are some magic variables already in scope. By default that’s x, y and a. All of these are terrible variable names, but will change them in a minute.
Everything from now on will be in the editor unless I say otherwise. When I write:
print y
then you type it into the editor and press the test button. It should print a number in the grey box at the bottom. It’s python 2.7 so no brackets on the print. It’s actually IronPython, but we’ll sweep that under the carpet for now.
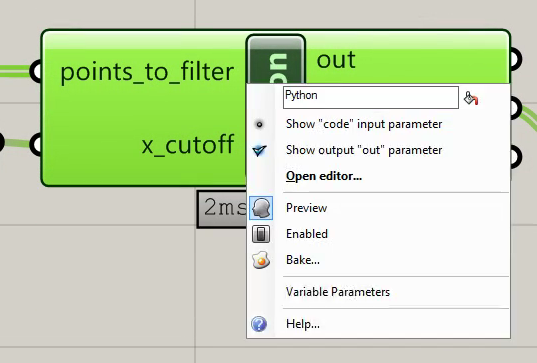
We can also print x and we’ll get something that looks like this e194b904-86a1-48ed-ad8e-75c6e8b8b364. This is a GUID (Globally Unique IDentifier) which is cool, but a pain to work with. If we jump out of the editor and right click on x then we get this menu:
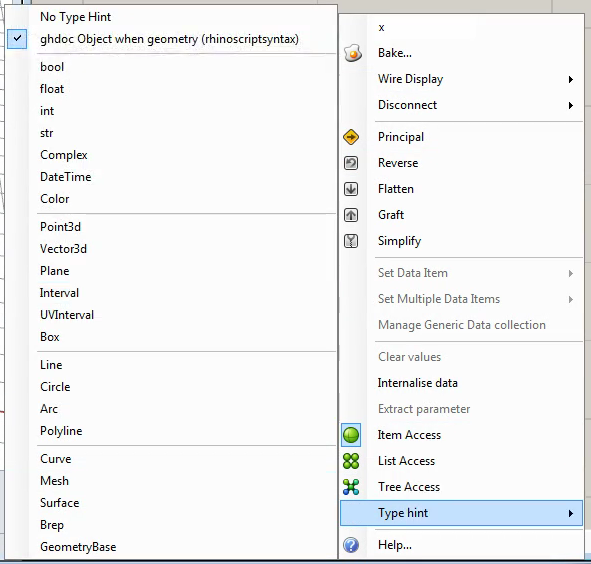
We want to give the input a type hint so we don’t need to look after the GUID ourselves. As it’s getting points, let’s pick Point3d. Now if we look in the editor it prints 0.0553423445929505,8.63313403382578,1.51597924042306 which is the x,y,z values of the point.
:blowfish: What? There’s a hundred points. Why is is only showing one? This is some grasshopper magic. It’s taking each one and running the python script for each element. We can use this to make our life easier. We can make the filter like this:
if x.X > y:
    a = x
So if we plug our spheres into the a output it works exactly like our cull-based filter. This is nice, super terse, but single letter variables are :poop:.
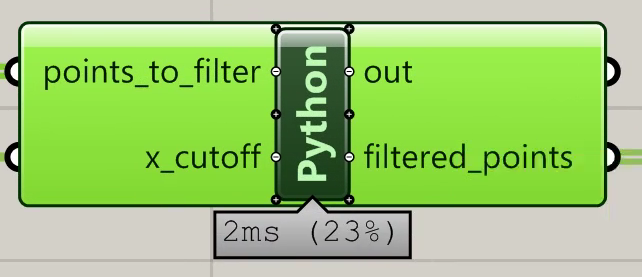
If we right click on the inputs and rename them then we need to do the same in the code, but doesn’t this look nicer:
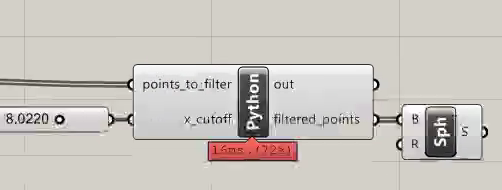
and the code looks like this:
if points_to_filter.X > x_cutoff:
    filtered_points = points_to_filter
Which is much more readable.
Performance
We could stop here, it works, so why do more. In most cases in the wild this is where you’d stop. But if we look at the performance indicators on the bottom of the nodes, and we see that our python node is a resource hog, there are things we can do to speed it up.
Computer things happen very fast, too fast to really understand. Let’s use a culinary analogy. If we’re topping strawberries, the way we’re doing it would be:
- put on our chef whites
- clean the kitchen
- get the strawberries out of the fridge1
- get a chopping board out
- top one strawberry
- put it in the bowl of topped strawberries
- put the chopping board away
- put the strawberries away
- change back onto normal clothes
goto 1
Which is a bit inefficient! We’d rather do:
- put on our chef whites
- clean the kitchen
- get the strawberries out of the fridge1
- get a chopping board out
- while there are still strawberries:
- top one strawberry
- put it in the bowl of topped strawberries
- put the chopping board away
- put the strawberries away
- change back onto normal clothes
This is technically thought of as the startup cost of the node, and if it’s called a lot of times with item access, then there’s n × startup to do, but if we can use list access then the startup and teardown is only called once.
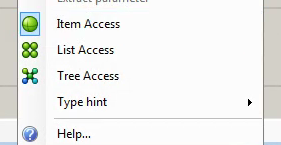
Setting this option will make it break because we’re now dealing with a list, but we know how to modify our code to handle it:
filtered_points = []
for p in points_to_filter:
    if p.X > x_cutoff:
        filtered_points.append(p)
so for minimal extra work, we get a big performance improvement. For simple tasks like this where the bulk of the work is in setup and teardown it can be more than three times faster! :racehorse:
Documentation
Remember how much of a jerk past-you is? Let’s work with present-you to make future-you happy.
There isn’t really a sense that you can do auto-documentation in grasshopper, but you can spoof it a bit.
A python node in grasshopper can have as many inputs and outputs as you like.
if we zoom in a really long way we get + & - buttons. Click a + and rename it docstring.
Then we can just make a variable called docstring and assign a string to it.
docstring = """Filter Points, return those with X > x_cutoff.

points_to_filter expects a list of Points
x_cutoff expects a number

filtered points gives a mixed list of points and null
"""
filtered_points = []
for p in points_to_filter:
    if p.X > x_cutoff:
        filtered_points.append(p)
So now you’ll get some help from the docstring output. You can hover over it, or you can put it into a panel.
Maintainability
Something to remember is that your python inside grasshopper isn’t under source control. You can get it out of Grasshopper and keep it in a .py file on your computer (or network) somewhere. That feels a bit safer and more maintainable.
You can add a code input, which is different to the other inputs in that you pass it a string of the python that you want to run. Youc an get that string from anywhere, you could even generate it with another python node if you are feeling meta.
Another thing to think about is that if you make a sweet python node that does cool stuff, you might want to use it all over your document. If you copy and paste it, then you want to change the code, you need to change the code in every. single. one. :hurtrealbad:
If you pop your python node into a cluster and then copy it you only need to edit the inside of the cluster once. You can also make the docstring available to the outside of the cluster.
Doing geometry things and other rhino stuff
So far we’ve only talked in terms of managing data. I find that managing data is what python nodes do best, but they can do anything that you can do with grasshopper, and a bit more too. I’m not going to go into too much depth, because there are lots of tutorials already on RhinoScript. The only differences are that this is python-flavoured-RhinoScript, and that whenever you see examples, they are usually a bit easier in grasshopper. E.g. This is the full RhinoScript example for drawing a line:
import rhinoscriptsyntax as rs
start = rs.GetPoint("Start of line")
if start:
    end = rs.GetPoint("End of line")
if end:
    rs.AddLine(start, end)
but if you were in grasshopper, you’d already have the end points, so it’d be something like:
import rhinoscriptsyntax as rs
a = rs.AddLine(start, end)
assuming that you have inputs called start and end, and an output called a.
The RhinoScript 101 document is a good place to learn how this all works. There’s also a full set of API docs for how the python version works.
This week’s reading :books:
Victor, B. Inventing On Principle.